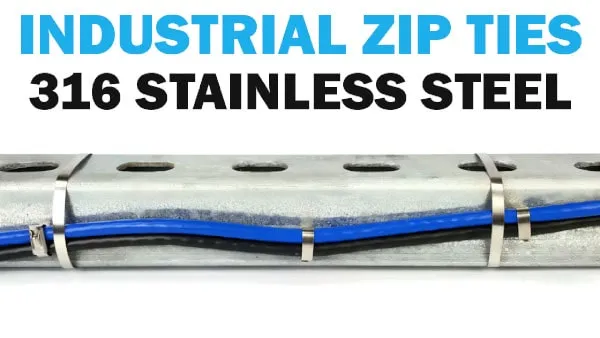
When standard nylon zip ties fall short under extreme conditions, stainless steel cable ties step in as the ultimate heavy-duty bundling solution. Manufactured primarily from high-grade 304 or 316 stainless steel, these metal tie wraps offer unmatched resistance to corrosion, extreme temperatures, UV radiation, and aggressive chemicals. They provide a high-tensile strength fastening option engineered to survive harsh environments where synthetic fasteners degrade and fail.
The Internal Locking Mechanism Explained
The reliability of steel cable ties relies entirely on their specialized internal locking mechanism, most commonly designed as a self-locking ball bearing system.
The Mechanism: Inside the tapered head of the tie sits a small, high-hardness rolling ball.
How It Locks: As the tail of the metal cable tie is inserted and pulled through, the ball moves freely, allowing the band to tighten.
The Security Feature: When tension is applied in the opposite direction, the ball wedges firmly against the angled ramp inside the head, locking the steel band permanently in place.
This design ensures a low-friction insertion coupled with an incredibly secure, tamper-proof grip that will not back out or slip under heavy loads.
Why Choose Stainless Steel Tie Wraps?
Key Features and Material Benefits
When plastic fasteners fail under extreme conditions, stainless steel tie wraps are the ultimate upgrade. Built to survive environments that degrade nylon, these steel zip ties offer unmatched durability and a high tensile strength that keeps heavy bundles secure.
We engineer our premium ties to withstand the harshest elements. Here is a quick breakdown of their core material benefits:
Feature
Performance Benefit
Extreme Temperature Resistance
Withstands freezing cold and scorching heat without melting or snapping.
Corrosion & Chemical Proof
Resists salt water, acids, and harsh industrial chemicals.
UV Protection
Will not dry out, crack, or become brittle under direct sunlight.
High Tensile Strength
Supports heavy duty loads far beyond standard plastic alternatives.
For applications requiring long-term reliability outdoors or in high-heat zones, choosing high-quality zip ties ensures your installations remain safe and intact for years.
Common Industrial and Heavy-Duty Applications
Stainless steel cable ties are the go-to choice across demanding industries where failure is not an option. Their rugged construction makes them essential for securing heavy cables, pipes, and hoses in high-stress environments.
Automotive & Aerospace: Securing high-heat exhaust wraps, turbocharger blankets, and engine bay wiring.
Marine & Offshore: Bundling cables on ships and oil rigs where constant saltwater exposure destroys normal fasteners.
Construction & Utilities: Fastening outdoor signage, heavy conduits, and solar panel arrays exposed to severe weathering.
Manufacturing Plants: Organizing heavy-duty machinery lines and routing hoses near chemical processing areas.
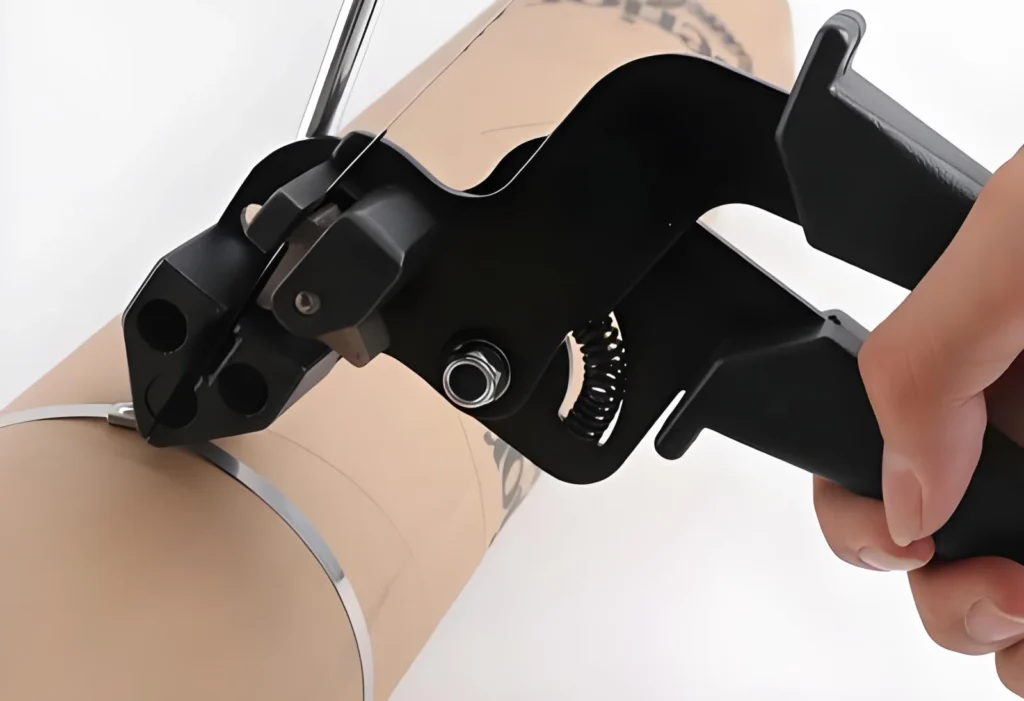
Tools Required to Tighten Metal Cable Ties
Getting a secure, reliable hold on your stainless steel cable ties requires the right equipment. While you can technically manage with standard hand tools, using specialized gear makes a massive difference in efficiency and safety.
Dedicated Cable Tie Tensioning Guns
For the best results, a professional metal cable tie tool or tensioning gun is the top choice. These tools are specifically engineered to handle the high tensile strength of steel zip ties.
Consistent Tension: A metal cable tie gun pulls the tie to a precise, pre-set tension level, ensuring uniform tightness across all your bundles.
Flush Cutting: Once the optimal tightness is reached, the tool automatically cuts away the excess tail, leaving a smooth, flush finish with zero sharp edges.
Speed: It significantly speeds up high-volume installations in industrial environments.
If your installation environment requires keeping plastic particles out of production lines altogether, you might also consider specialized metal detectable cable ties for sensitive food or pharma processing zones alongside your heavy-duty steel options.
Alternative Methods Using Pliers, Wrenches, and Cutters
If you only have a few metal tie wraps to install, you can get the job done using common manual tools.
Lineman’s or Needle-Nose Pliers: Grip the tail of the stainless steel tie wraps firmly near the locking head and pull to tighten. You can also use a second pair of pliers or a wrench to lever against the head for extra mechanical advantage.
Diagonal Cutters or Tin Snips: Once tensioned, use heavy-duty cutters to trim the excess tail.
Safety Precaution: Manual trimming always leaves a sharp tab. You must manually bend or file down the cut edge to prevent laceration hazards during future maintenance.
How to Tighten Metal Tie Wraps: A Step-by-Step Guide
Installing stainless steel tie wraps requires a slightly different approach than standard plastic zip ties. Because metal doesn’t stretch, getting a secure hold relies on proper technique and the right tools. Here is exactly how to tighten metal tie wraps for a rock-solid, professional finish.
Step 1: Positioning the Tie and Preliminary Manual Tensioning
Before applying any tools, wrap the metal cable tie around the bundle or object you are securing. Feed the tapered tail through the locking head.
Align the tie: Ensure the strap sits flat and square against the surface without twists.
Pull by hand: Pull the tail manually to take up the initial slack.
Check placement: Verify that the tie is in its final position before applying heavy tension, as metal ties are difficult to reposition once locked.
Step 2: Engaging the Tightening Tool or Pliers
To achieve the maximum holding power required for heavy-duty applications, manual pulling is rarely enough.
Using a metal cable tie gun: Slide the nose of the gun over the tail of the tie until it flushes against the locking head. Grip the trigger repeatedly to crank the tension up.
Using pliers: If you don’t have a dedicated tool, grip the tail firmly with a pair of linesman or needle-nose pliers. Brace the pliers against the locking head and rotate them to lever the tie tighter.
Step 3: Checking Tension and Adjusting Tightness
Before making the final cut, you must verify that the tension is correct.
The wiggle test: Try to twist or slide the tie wrap. If it moves easily, it needs more tension.
Check bundle compression: Ensure the tie is snug enough to hold the load securely without crushing or damaging sensitive cables.
Incremental adjustments: Give the tool one or two extra clicks if you detect any remaining slack.
Step 4: Securing and Cutting the Excess Tail Cleanly
Leaving a long, exposed metal tail is a major safety hazard. The final step ensures a clean, flush finish.
Automatic flush cut: If you are using a professional stainless steel zip tie tool, the tension gun will automatically snip the tail flush with the head once it reaches your pre-set tension level.
Manual trimming and bending: If you are using pliers and wire cutters, snip the tail as close to the head as possible. Use your pliers to bend any remaining small tab down flat against the head to eliminate sharp, snagging edges. Knowing how to handle these rigid fasteners cleanly makes a big difference, especially when working with high-strength options like the strongest zip ties on the market.
How Tight Should a Metal Cable Tie Be?
Determining Proper Tension Without Over-Tightening
Finding the right tension for metal tie wraps comes down to securing the bundle without crushing the underlying materials. Unlike plastic ties, stainless steel does not stretch or flex over time. The ideal tension means the tie is snug enough that it cannot be rotated or slid along the cable bundle by hand, yet loose enough that it doesn’t pinch or deform the jackets of the cables inside.
When securing sensitive data lines or insulated hoses, apply tension until the tie is flush against the surface. If you are using a dedicated metal cable tie tool, set the tension gauge to the manufacturer’s recommended setting for your specific tie width to ensure consistent, safe execution every time.
Signs of Loose or Over-Tensioned Metal Ties
Improperly tensioned tie wraps in metal configurations will eventually lead to installation failure or damaged equipment. Look out for these specific visual indicators:
Signs of Loose Ties:
The tie easily slides up and down the cable bundle.
Individual cables can be pulled out of the bundle with minimal effort.
The internal locking ball rattles inside the hood, indicating a lack of back-tension.
Signs of Over-Tensioned Ties:
The metal band cuts into or visibly deforms the cable insulation.
The locking head deforms, bends, or flares outward under extreme stress.
The tie snaps abruptly during or immediately after the installation process.
Common Mistakes to Avoid When Installing Metal Zip Ties
Incorrect Insertion and Manual Pulling Errors
When working with stainless steel tie wraps, the most common mistake is threading the tail into the locking head from the wrong direction. If inserted backwards, the internal ball bearing cannot engage, causing the tie to slip immediately under tension.
Another frequent error is relying solely on your bare hands to pull the tie tight. Attempting to manually yank a steel zip tie to its final tension rarely achieves the required tightness and often leads to painful finger cuts. Manual pulling fails to lock the tie securely enough to meet its rated cable tie tensile strength, which can cause the bundle to sag or shift over time in high-vibration industrial environments.
Always check the entry angle: Ensure the tail slides smoothly over the locking mechanism.
Stop hand-tightening early: Use hands only for the initial snug fit, then switch to a tool.
Never pull at an angle: Pulling the tail sideways during installation can warp the metal strap and ruin the lock.
Leaving Sharp Edges After Trimming
Leaving a long, ragged tail or a sharp protruding edge after cutting a metal tie wrap creates a serious safety hazard. Stainless steel edges act like razor blades, easily slicing through technician gloves, neighboring wires, or sensitive hoses during routine maintenance.
Using standard wire cutters often twists the metal and leaves a jagged, pointed spur. To prevent injuries and protect your equipment, always use a dedicated metal cable tie tool that flushes the cut completely against the locking head, or use heavy-duty end nippers to bend the remaining tab flat.
Trimming Method
Resulting Edge
Safety Rating
Standard Side Cutters
Jagged, razor-sharp spur
Dangerous
Metal Cable Tie Gun
Completely flush, smooth finish
Safe & Professional
Pliers + Manual Bending
Rounded tab, slightly bulky
Acceptable
Frequently Asked Questions About Metal Tie Wraps
Can You Reuse Stainless Steel Cable Ties?
Generally, standard stainless steel cable ties are designed for single-use applications. Once the tail passes through the locking head, the internal ball bearing locks firmly into place to provide maximum security. Forcing them open usually damages the locking mechanism, compromising their strength. However, reusable coated metal tie wraps do exist for temporary setups, featuring a release tab. For permanent, heavy-duty bundling, we always recommend using a fresh tie to ensure absolute reliability. If you are working on lighter outdoor projects that require standard nylon options instead, you might also consider specialized tie wraps with screw hole configurations for easy surface mounting.
How Do You Release a Locked Metal Tie Wrap?
Releasing a locked ball-bearing metal tie wrap requires a bit of finesse if you want to avoid cutting it. Here is the quickest method to unlock them:
Locate the locking head: Find the small slot where the tail enters the head mechanism.
Insert a pin or needle: Take a sturdy pin, small flathead screwdriver, or paperclip and insert it into the locking box right under the band.
表 Lift the mechanism: Push down or lift slightly to move the internal steel ball away from the strap.
Pull the tail backward: While holding the ball back, gently back the tail out of the head.
Safety Tip: If the tie is under extreme tension, do not attempt to release it manually. Use a dedicated metal cable tie tool or heavy-duty wire cutters to safely snip the band and prevent snapping injuries.
Zip ties, also called cable ties, are available in a wide range of shapes, sizes, and strengths to suit various tasks. However, for jobs requiring extra durability, heavy duty zip ties are the ideal solution. With so many options on the market, it can be challenging to determine which one is best suited for your […]
Why You Might Need an Alternative to a Heat Gun While an electric heat gun is the industry standard for activating heat shrink tubing, it is not always the most practical or accessible tool for every scenario. Resourcefulness is key in electrical maintenance, and understanding how to achieve a professional-grade seal with alternative heat sources […]
What Are Metal Cable Ties and How Do They Work? Metal zip ties are the ultimate fastening solution for demanding industrial and outdoor environments. Built to withstand extreme temperatures, harsh chemicals, and heavy loads, these durable fasteners provide permanent, reliable bundling where traditional plastic alternatives simply fail. Understanding how to use metal cable ties effectively […]
We use cookies to enhance your browsing experience, serve personalised ads or content, and analyse our traffic. By clicking "Accept All", you consent to our use of cookies.
Looking For High Quality Nylon Cable Ties At A Great Price?
Order now to experience cost-effective cable tie products that provide convenience and protection for your work and life.